
⚠️ Who is this article for? This guide is for Entity Admins and Unit Heads with Edit permission for the ACT Module. If the Add action plan button is not available, you may have View-only access — see ACT Module permissions and how to enable it.
Action Plans are your workspace for turning survey insights into concrete next steps. Once you have identified what to focus on using the Dimensions and Action Suggestions feature, Action Plans are where you document what you will do, who is responsible, and by when — creating a clear, trackable record of your commitments.
💡 Where to start: Begin by reviewing your dimension scores and action suggestions before creating plans. See how to explore Dimensions and Action Suggestions.
Creating an Action Plan from a Suggestion
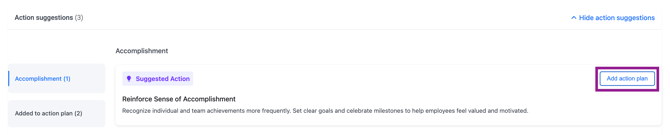
The fastest way to create an action plan is directly from an Action Suggestion — this is the recommended starting point for most users. On the Actions tab, scroll to the Action Suggestions section and click Show action suggestions to expand it. Find an idea you want to act on and click Add action plan next to the suggestion card.
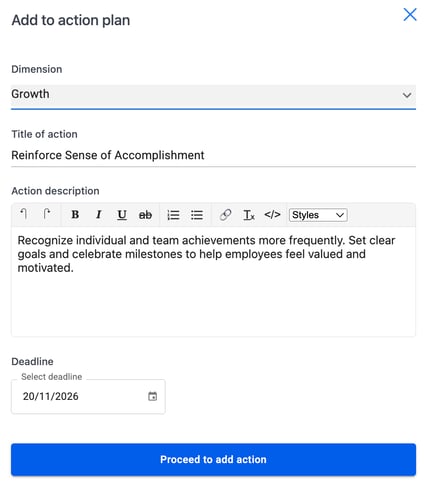
An "Add to action plan" modal will appear with the following fields to complete:
- Dimension — pre-filled based on the suggestion, but you can change it using the dropdown if needed.
- Title of action — pre-filled from the suggestion. Edit it to make it more specific to your team's context.
- Action description — pre-filled from the suggestion. Use the rich text editor to format, edit, or expand on the description as needed.
- Deadline — use the date picker to set a target completion date. This is optional but strongly recommended.
Once complete, click Proceed to add action. Your action plan will be created and will appear in the Action Plan section.
Creating a Custom Action Plan from Scratch
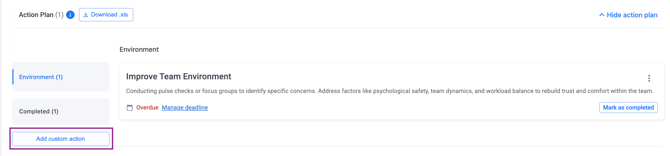
If you have an action in mind that is not covered by the suggestions — for example, something specific to your team's unique situation — you can create a fully custom plan. On the Actions tab, click Show action plan to expand the Action Plan section, then click Add custom action. The same "Add to action plan" modal will appear — fill in the Dimension, Title, Description, and Deadline, then click Proceed to add action.
Managing Your Action Plans
Each action plan appears as a card in the Action Plan section, showing the title, description, and deadline at a glance.
- Editing a plan — click the three-dot menu on the action card and select Edit. Update any details and click Proceed to add action to save.
- Completing a plan — when an action has been completed, mark it as done. The plan will automatically move to the Completed tab, creating a clear record of what has been accomplished.
- Deleting a plan — click the three-dot menu and select Delete. Deleted action plans cannot be recovered.
Exporting Your Action Plans
When you need a full record of every action plan across your organisation — for reporting, leadership reviews, or audit purposes — use the export feature. It delivers all action plans you have permission to see as a single Excel file sent directly to your email.
To trigger an export:
- Go to the Actions tab on your survey dashboard.
- Make sure you are on the Action plans per unit tab.
- Click the Download .xls button next to the Action Plan section header.
- A confirmation message will appear on screen: your download has been queued and will be sent to your email shortly.
- Check your email for a message with the subject: "Your action plan excel is ready for download."
- Click Download File in the email to save the Excel file.

The exported file contains two sheets:
- Sheet 1 — Instructions: An explanation of the file contents and column definitions.
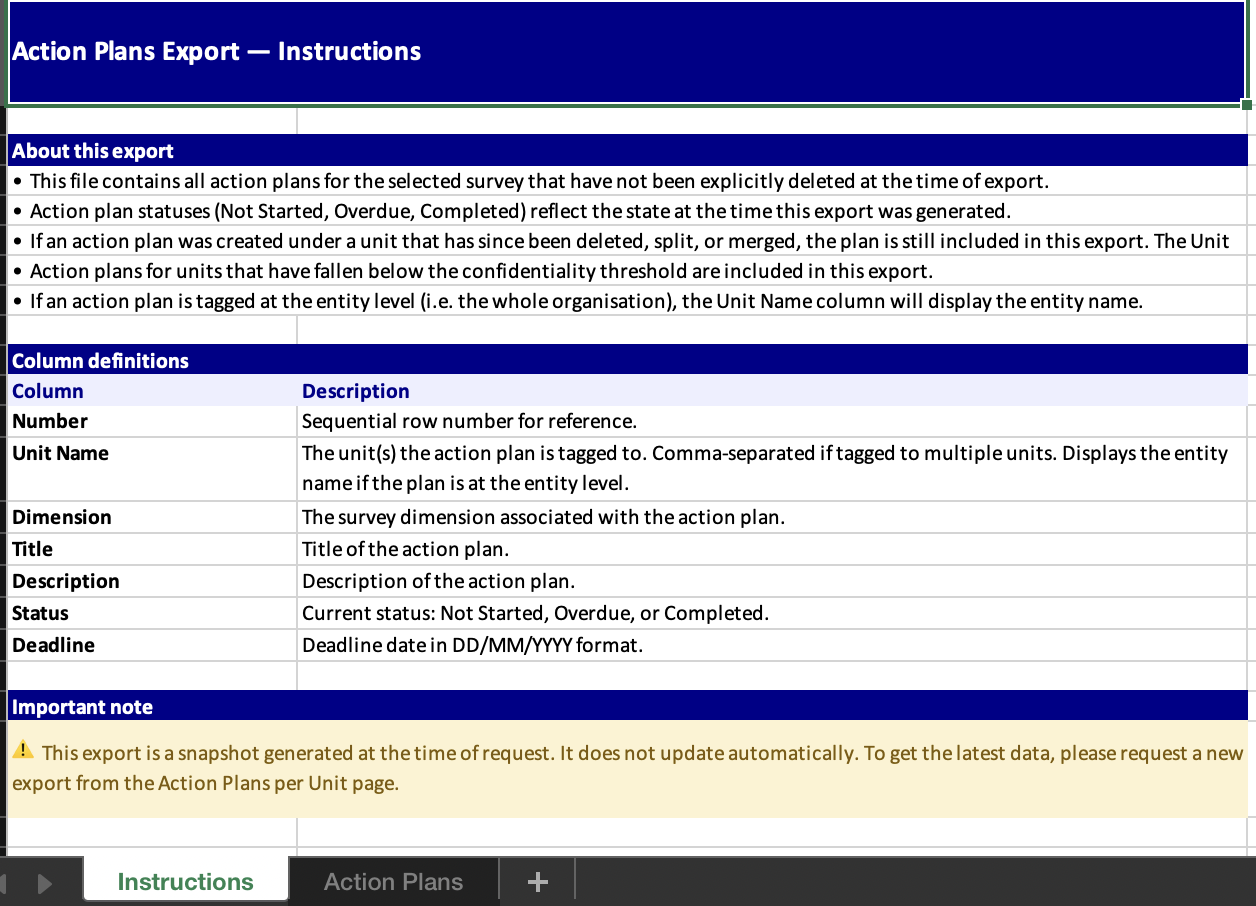
- Sheet 2 — Action Plans: One row per action plan, with columns for Unit Name, Dimension, Title, Description, Status, and Deadline.

What your role determines:
- Entity Admins see all action plans across the entire organisation.
- Unit Heads see only action plans tagged to their own teams.
⚠️ Important: The export is not an immediate download, the file is generated in the background and delivered by email. This may take a few minutes depending on the size of your data. Your current on-screen filters do not affect the export, regardless of which unit you are viewing, the export always contains all action plans you have permission to see. The download link in the email expires after 7 days. If the link no longer works, return to the platform and click the export button again to request a new file.
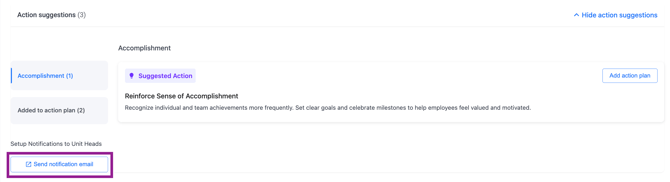
Notifying Unit Heads About Their Action Plans
Once action plans have been set up, you can notify Unit Heads directly from the Actions tab. Scroll down to the Setup Notifications to Unit Heads section and click Send notification email. This will redirect you to the Communication page and sends an email to the relevant Unit Heads letting them know their action plans are ready to view — helping ensure follow-through across your organisation. Go to the [insert article in communication page for the actions]
Important: How Filters Affect Your Action Plans
Action Plans are linked to the unit filter context that was active when they were created. If you created an action plan while viewing the Sales Department unit, that plan will only be visible when the Sales Department filter is active. If you switch to a different unit or clear all filters, the plan may appear to have disappeared — it has not been deleted, it is simply not visible in the current filter context.
⚠️ Important: To see all your plans, make sure your unit selection matches the context in which they were created. If you are unsure, try switching through your available units to locate a missing plan.
Best Practices for Action Plans
- Start with your Top dimension to improve — this is where focused effort will have the greatest positive impact.
- Share your action plans with your team. Closing the feedback loop by showing employees you have listened and are acting on their feedback is one of the most powerful ways to build trust and encourage future participation.
- Use the Send notification email feature to make sure Unit Heads are aware of and engaged with their action plans.
- Set realistic deadlines — action plans with due dates are significantly more likely to be completed than those without.
- Review your action plans regularly, not just after each survey — make it a standing agenda item in your team meetings.
Something Not Working?
The Add action plan button is not available.
- Likely cause: You may have View-only permission for the ACT Module.
- Action: Ask your Entity Admin to grant you Edit permission. See ACT Module permissions and how to enable it.
An action plan I created is no longer visible.
- Likely cause: Action Plans are linked to the unit filter context in which they were created — a different unit may currently be selected.
- Action: Switch your unit selection to match the unit that was active when you created the plan. Check the "Added to action plan" count in the left panel of Action Suggestions to confirm how many have been added per dimension.
I want to delete an action plan but cannot find the option.
- Likely cause: Only users with Edit permission can delete action plans.
- Action: Check your ACT Module permissions with your Entity Admin. See ACT Module permissions and how to enable it.
The Send notification email button is not visible.
- Likely cause: This feature is only available to users with Admin-level access to the ACT Module.
- Action: Check your ACT Module permissions with your Entity Admin. See ACT Module permissions and how to enable it.
Still Need Help?
If you have questions about creating or managing your Action Plans, reach out to us at support@engagerocket.co and we'll be happy to assist!