
⚠️ Who is this article for? This guide is for Entity Admins who need to add employees to EngageRocket and maintain their data over time. Your Organisational Chart must be uploaded before completing this step. If you haven't done that yet, see the org chart upload guide first.
Your Employee List is the foundation of everything in EngageRocket — it determines who receives surveys, which unit they belong to, and what demographic data is available for filtering your dashboard results.
Uploading Your Employee List for the First Time
- Click on the 'Employees' tab in the top navigation bar.
- Select 'Employee List' from the left-hand panel.
- Click the 'Import' button at the top right of the Employee List page.
- Click 'Download Template' to get a blank copy. Always use the latest template downloaded directly from the platform, do not reuse older versions, as column headers may have changed.
- Fill in the template carefully, following these rules:
- Columns A to G are mandatory system columns. Do not modify the headings or delete these columns, even if certain fields are not in use for your organisation.
- Full Name and Email Address (or Unique Employee ID) are required for every row and cannot be left blank.
- Date fields such as Start Date must follow the format DD/MM/YYYY exactly. Excel may auto-reformat dates — verify the cell format after entering the data.
- Start Date is required to calculate employee tenure and for employees who will be included in Milestone surveys.
- Custom demographic attributes (e.g. Job Family, Job Grade) can be added in columns after Column G. These will be available as filters on your dashboard.

- Save the completed file in .xlsx format.
- Upload the file by dragging and dropping it onto the import page, or click to browse and select it manually.
- Review the validation report. Fix any errors flagged and re-upload if needed.
Updating Your Employee List After the Initial Upload
Once your list is uploaded, you have two options for keeping it up to date. Choose the right one based on your situation.
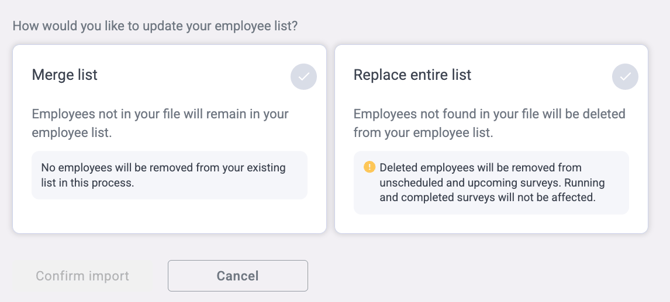
Option A: Merge List — Recommended for Most Updates
Use Merge List when you want to add new employees or update existing employee details without removing anyone from the current list. This is the safest option for routine updates.
- Download a fresh template or export your current employee list from the platform.
- Add new employees or update attributes for existing ones.
- Upload the file using the 'Merge List' function. New employees will be added, existing records will be updated, and no one will be removed.
Option B: Replace Entire List — Use With Caution
Use Replace Entire List only when you have a completely new employee dataset that should replace all existing records.
- Prepare a complete and final employee list that includes every employee who should remain in the system.
- Upload using the 'Replace Entire List' function.
⚠️ Important: Replace Entire List will permanently remove all employees not included in your upload file. Any historical survey data linked to removed employees will be affected. Use this option only when absolutely necessary and always double-check your file before uploading.
Need to update your employee list in the future? Simply click Download employees button make your edits, and upload it back, no need to start from scratch!

Adding or Editing a Single Employee
- To add one employee manually: Go to the Employee List, click 'Add Employee', fill in their details in the slide-out panel, and click 'Save changes'.
- To edit an existing employee: Find them in the Employee List, click on their name to open their profile, update their details, and click 'Save changes'.
Something Not Working?
Upload fails with a 'Unit Code not found' error.
- Likely cause: The unit assigned to an employee in your file does not match any unit in your Organisational Chart.
- Action: Check for spelling differences, extra spaces, or capitalisation mismatches between the unit names in your Employee List and your Organisational Chart. See the org chart guide for reference.
Upload fails with a duplicate email error.
- Likely cause: An employee appears more than once in the file, or the same email is listed in slightly different formats.
- Action: Check for duplicate rows and ensure each employee has a unique email address before re-uploading.
Tenure is not calculating correctly.
- Likely cause: The Start Date is not in the correct format, or Excel has auto-reformatted the date.
- Action: Ensure Start Date is entered as DD/MM/YYYY exactly. Check the cell format in Excel after entering the data to confirm it has not been auto-converted.
I used Replace Entire List by mistake and lost employee data.
- Likely cause: Replace Entire List was used when Merge List was intended.
- Action: Contact our support team at support@engagerocket.co immediately and do not make any further changes. Data recovery may be possible depending on how recently the upload occurred.
I'm not sure whether to use Merge List or Replace Entire List.
- Action: Use Merge List for all routine updates (adding or editing employees). Only use Replace Entire List when you need to completely overwrite all existing records with a new dataset.
Still Need Help?
If you are having trouble uploading or updating your employee list, reach out to us at support@engagerocket.co and we'll be happy to assist!