
⚠️ Who is this article for? This guide is for Entity Admins managing historical data imports in EngageRocket. If you cannot see the Import Historical Survey button in your project, you may not have the necessary permissions — contact your Entity Admin for help.
The Historical Data Import feature lets you upload survey results that were collected outside of EngageRocket, or previously collected inside it, so they appear on your dashboard and contribute to trend comparisons alongside your live surveys. This article covers the full five-step import process. For help filling in the Excel template itself, see How to fill in the historical survey import template.
💡 When to use this feature: Use the Historical Data Import when you want to show historical trends alongside upcoming surveys, when you need to reconfigure existing data (such as regrouping questions or updating dimension assignments), or when you need to duplicate past data for training, testing, or separate stakeholder access.
Before You Start — Upload Order Is Critical
⚠️ Important: Always upload historical surveys from oldest to newest. The platform trends results based on upload order. If you upload a 2024 survey before a 2023 survey, the trend will display in the wrong direction and this cannot be undone.
Step 1: Prepare Your Org Structure First
Before importing any survey data, make sure your latest and accurate organisational chart has been uploaded to the platform. This is mandatory — results tied to units missing from the org structure will not appear correctly on the dashboard.
Go to Employees > Organisational Chart > Bulk Actions > Import Units and upload your full org structure from Level 0 down to the deepest level. Check unit names carefully — every unit name in your import file must match your org structure exactly, including capitalisation, punctuation, and spacing. A single character difference will cause results to disappear or roll up incorrectly.
If you have not uploaded your org chart yet, see How to upload your organisational chart. If you need to update an existing one, see How to edit an existing organisational chart.
Step 2: Create a Project and Select the Import Option
Go to the Projects section and click +Create new project. Name it clearly (e.g. Employee Engagement Survey), select One-off survey as the project type, set the confidentiality threshold, and click Create.
After the project is created, a prompt will appear asking: "How would you like to start your first survey?" Select Import a historical survey with past responses and click Proceed.

💡 Using an existing project instead? Navigate to the existing project and click Import Historical Survey at the top right of the project page to go directly to the next step.

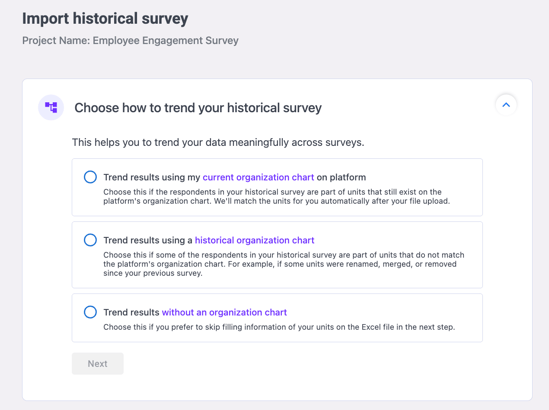
Step 3: Choose How to Trend Your Historical Data
Immediately after clicking Proceed, the platform will show the "Choose how to trend your historical survey" screen. Select one of three options and click Next.
Trend results using my current organization chart on platform — Choose this if the respondents in your historical survey belong to units that still exist in your current org chart. The platform will match the units for you automatically after your file is uploaded. This is the simplest option if your org structure has not changed.
Trend results using a historical organization chart — Choose this if some respondents belong to units that no longer match the platform's current org chart — for example, if units were renamed, merged, or removed since the previous survey. You will need to manually map every respondent to their historical unit in the Excel template.
Trend results without an organization chart — Choose this if you prefer to skip filling in unit information in the Excel file entirely. Best suited for high-level comparisons such as overall eNPS trends where unit-level breakdown is not needed.
Step 4: Download, Fill In, and Upload the Template
After selecting your trending option, the "Upload your historical survey template" section will appear on the same page. Follow these three steps in sequence:
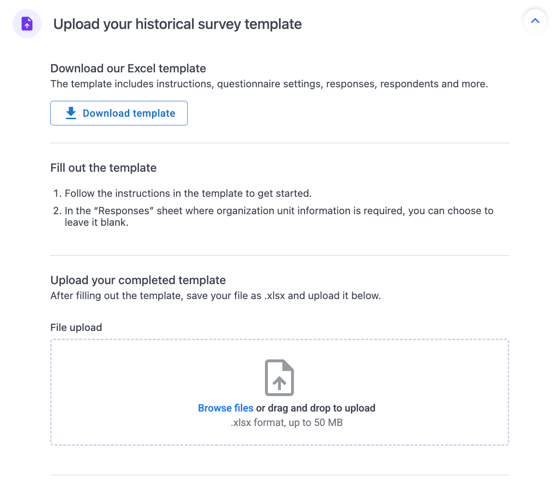
Download the template — Click Download template to get the Excel file. The template includes tabs for instructions, questionnaire settings, responses, respondents, and more.
Fill out the template — Follow the instructions in the Instructions tab before filling in anything else. If you selected Trend without an organization chart, you can leave the organisation unit column in the Responses sheet blank.
Upload your completed template — Once filled, save the file in .xlsx format and upload it by clicking Browse files or dragging and dropping it into the upload area. The file must be .xlsx format and no larger than 50 MB.
💡 Good to know: For a full tab-by-tab guide to completing the template correctly, see How to fill in the historical survey import template.
Step 5: Validate, Confirm, and Verify Your Results
The system will validate your uploaded file. If there are errors, an error message will appear — fix the issues in the template and re-upload. If validation passes, review the summary and confirm. The system will show a success message and begin importing.
💡 Large files: For files with 15,000 to 25,000 respondents, validation and import may take up to 60 minutes. Do not close the browser tab while the import is in progress.
Once the import is complete, open the dashboard and hover over the trend chart to verify the respondent count per survey period. Drill down into individual unit dashboards to confirm respondent counts, check key metrics such as favourability scores and eNPS, and validate that demographic filters are working correctly. Repeat Steps 4 to 5 for each additional historical survey, always uploading in chronological order.
What to Expect After Your Historical Data Is Uploaded
Once your historical survey data is uploaded, there are a few things to be aware of when viewing results on the dashboard.
No participation rate data will appear in the Overview tab for historical surveys. This is expected behaviour, historical data does not carry participation rate information under this specific tab.

To see the participant count for specific attributes, go to the Hotspots tab and apply a filter. The tab will show participation details for your selected attributes.
Something Not Working?
Units are missing from my imported dashboard results.
- Likely cause: A unit name in your import file does not match your org structure exactly.
- Action: Check for differences in spelling, capitalisation, or spacing — even a single extra space can cause a mismatch. Correct the file and re-import. See How to edit an existing organisational chart if you need to update your org structure first.
The trend is showing in the wrong chronological order.
- Likely cause: Historical surveys were uploaded out of sequence.
- Action: Contact support@engagerocket.co — reordering may require re-importing the affected surveys.
Validation keeps failing with no clear error message.
- Likely cause: The most common causes are date format errors in the Responses tab and leftover sample data in unused option tabs.
- Action: See How to fill in the historical survey import template for a detailed checklist of the most common validation issues per template tab.
The import is taking longer than expected.
- Likely cause: Large files with 15,000–25,000 respondents can take up to 60 minutes to process.
- Action: Keep the browser tab open and do not re-upload until the current import completes.
Still Need Help?
If you have questions about importing historical survey data, reach out to us at support@engagerocket.co and we'll be happy to assist!