
After completing all user invitations in the Entity User tab, the next foundational step is to set up your administrative controls.
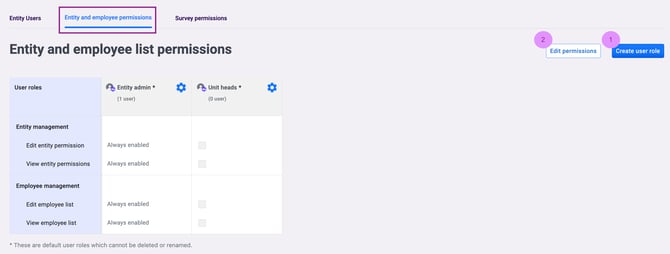
Entity & Employee Permissions Tab: Core Administrative Controls
This tab gives you control over the core administrative functions of your EngageRocket account. It’s where you set the foundation for secure and effective management.
Key actions include:
- Managing other users and roles, ensuring responsibilities are clearly defined within your team.
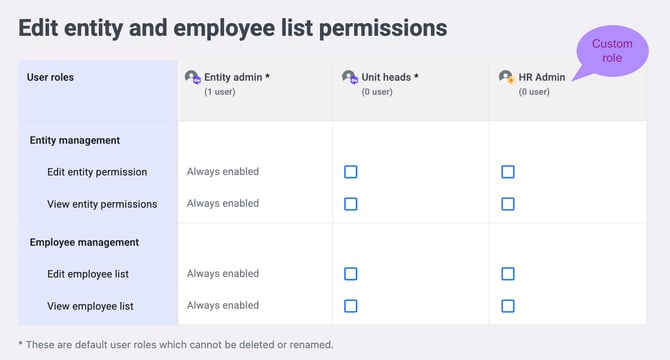
- Manage access to the permission page and the master employee list, essential for maintaining accurate and aligned employee data across your organization. Select or unselect each function to enable or disable access for each role.
*Note: All functions are always enabled for the Entity Admin role.
Survey Permissions Tab: Managing Surveys and Data Access
The Survey Permissions tab allows you to control who can create, manage, and view surveys ensuring sensitive feedback is handled securely while the right teams stay empowered.
1. Manage Survey Projects Access

From this section, you can define who is responsible for managing survey projects and You can assign permissions to allow users to:
-
Edit all survey projects
Create, edit, duplicate, and delete all survey projects across the entire entity. -
View all survey projects
View all survey projects and their settings without making any changes. -
Edit surveys
Create new surveys and manage individual survey projects. -
View surveys
View the settings and questionnaire of individual surveys.
Important: Edit permissions automatically include View access.
Ensure the correct Edit permission is selected at the survey or project level referring to the Survey Management on the left.
2. Control Dashboard Data Access

Beyond survey management, you can also control who can access survey results through Dashboard Permissions.
To access this section:
-
Click on the Survey Permissions tab
-
Select Edit permissions
-
Tick the relevant options to grant the user View or Edit access to All Survey Management permissions and the Dashboard Permissions section.

From the Dashboard Permissions section, you can define the level of data visibility:
-
View all respondents’ data
Grants access to aggregated survey results across the entire organisation, including Overview, Responses, and Hotspots. -
View own team’s data
Limits access to results for the user’s assigned team or unit only. This is the recommended setup for managers.
3. Action Permissions: Manage Action Plans with the Right Level of Access
The Action Permissions section lets you control who can view and manage action plans — ensuring accountability while keeping ownership clear.

From this section, you can assign permissions at two levels:
Manage Own Action Plans: Use these settings to define what users can do with their own action plans. You can allow users to:

-
View own action plans
See action plans they are responsible for. -
Edit own action plans
Create, update, and manage the action plans assigned to them.
This setup is ideal for managers or action owners who need to track and update their own progress.
Manage All Action Plans
Use these permissions to grant broader visibility and control across the organisation. You can allow users to:

-
View all action plans
Access all action plans across teams and units. -
Edit all action plans
Create, edit, and manage all action plans organisation-wide.
This level of access is typically assigned to HR or administrators responsible for overseeing action progress across the organisation.
With flexible permission settings, you decide who can do what, keeping collaboration smooth and data secure. Empower your team with the right level of access, ensure accuracy across your organization, and manage everything with confidence, all in one place.
If you have any questions or need further assistance, feel free to reach out to us at support@engagerocket.co We're here to help!