
At EngageRocket, we understand that strong platform governance is key to delivering secure, reliable, and actionable people insights. Proper role management ensures the right stakeholders have the correct level of access, protecting data integrity while enabling smooth collaboration.
This guide walks you through the most efficient ways to manage user access and permissions within your entity, including bulk onboarding, individual invitations, role creation, and user status monitoring.
1. Streamlining Access with Bulk Import
For onboarding multiple users at once, especially when assigning several Entity Admins, Bulk Import is the fastest and most efficient method. We strongly recommend using this process before launching your survey, allowing all users to immediately monitor participation and access dashboards.
Bulk Import Steps
-
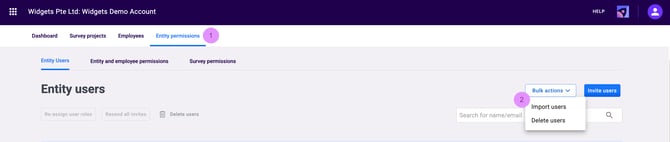
Navigate to Entity Permissions from the top navigation menu.
-
Select Bulk Actions → click Import Users.
-
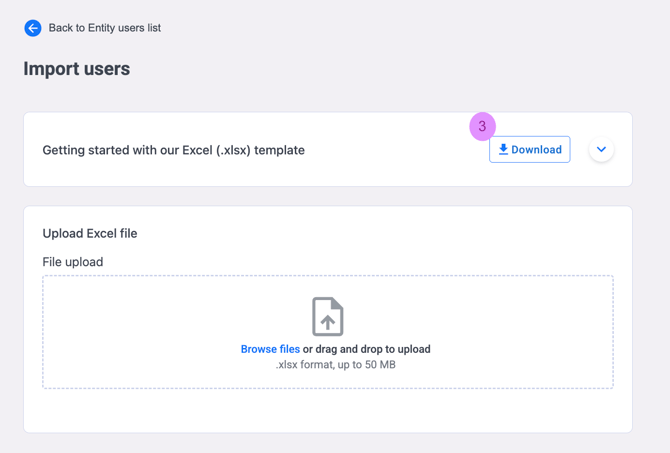
Download the latest User Import Template and populate the file with your users’ information.
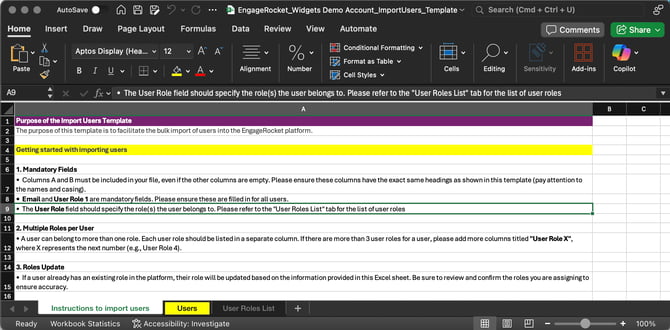
Mandatory Data Requirements
To ensure data accuracy and a successful upload, please note the following requirements:
-
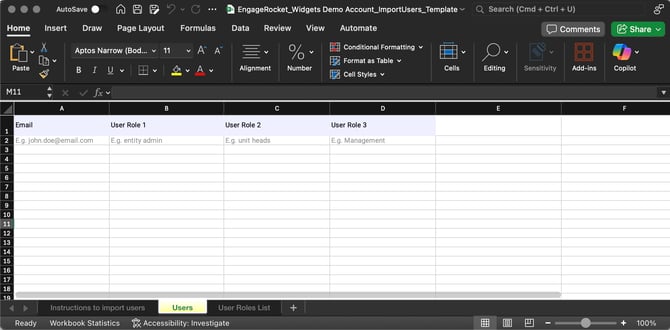
Columns A and B must remain in the template, even if no additional fields are completed.
-
The fields Email and User Role 1 are mandatory for all entries.
-
Column headers must remain exactly the same as the template, including spelling and capitalisation.
-
The User Role values must match one of the options listed in the “User Roles List” tab within the template.
Assigning Multiple Roles
A single user can hold more than one role if additional permissions are needed.
To assign multiple roles:
-
Add extra columns such as User Role 2, User Role 3, User Role X, etc.
-
Enter one role per column for the same user.
Once users accept their invitation, they will immediately have access to:
-
Survey administration tools
-
Participation monitoring
-
Dashboards, based on the roles assigned
2. Targeted Access via Individual User Invitations
For inviting specific users or smaller groups, the Invite Users function provides quick control without requiring bulk uploads.
Invitation Steps
-
Open the Entity Users tab.
-
Click Invite Users.
-
Enter one or multiple email addresses in the pop-up modal.
-
Assign at least one role to each user.
Note: The system does not allow invitations to be sent unless a role is assigned.
-
Click Send Invite.
✅ The platform automatically checks for Duplicate emails and Invalid email formats. This prevents sending invitations with incorrect user details, ensuring a clean, reliable user database.
3. Defining and Updating User Roles
Accurate permission control requires flexibility to create new custom roles or adjust existing user access at any time. To create a new role, refer to our step-by-step Create User Role Guide, which walks you through setting up and configuring custom roles tailored to your entity’s requirements.
Modifying or Reassigning Roles
When a user’s responsibilities change, their roles can be updated instantly:
-
Go to Entity Users.
-
Select the checkbox next to the user’s Full Name.
-
Click Re-assign user roles.
-
Select or deselect the relevant roles.
-
Click Re-assign User Role to confirm changes.
The updated permissions take effect immediately, ensuring continuous security and accurate access control.
4. Managing User Status and Security
Understanding invitation status and maintaining secure offboarding is critical for good user governance.
User Status Definitions
Each user profile displays one of the following statuses:
-
Active
The user has accepted their invitation and created a password. -
Pending
An invitation has been sent but has not yet been accepted. -
Expired
Invitations automatically expire after 7 days if not accepted.
✅ Resending Invitations:
For users with an Expired status, simply resend the invitation. This will grant them another 7-day window to accept and activate their account.
Secure User Deletion
When removing access, a confirmation step prevents accidental data loss. Steps to Delete Users
-
Select the user(s).
-
Click Delete users.
-
Type DELETE to confirm the action.
-
Confirm deletion.
Once confirmed, the user immediately loses access to your entity and all related permissions.
Best Practice Recommendations
-
✅ Use Bulk Import for onboarding multiple users ahead of survey launches.
-
✅ Always assign roles carefully to maintain data security.
-
✅ Review user access periodically — especially after organisational changes.
-
✅ Delete inactive users promptly to prevent unnecessary access risk.
Next, you’ll be guided through managing user roles, data access, and survey controls to ensure secure and seamless platform governance.
If you have any questions or need further assistance, feel free to reach out to us at support@engagerocket.co We're here to help!